

Finding affordable home workouts for people recovering from minor surgery felt impossible when I was fresh off the operating table with a hernia repair and zero motivation to move. I wanted to stay active, but everything online was either too intense or way too expensive. Personal trainers, fancy equipment, subscription apps charging $40 a month. None of it made sense for someone who just needed to move safely without breaking the bank or their stitches.
Why Moving After Surgery Actually Matters
Your doctor probably told you to “stay active but take it easy,” which is basically the most confusing advice on the planet. But they’re right. Gentle movement after minor surgery speeds up recovery, reduces the risk of blood clots, fights off the fog of anesthesia, and keeps your mood from tanking while you’re stuck at home.
I ignored this advice for the first four days after my procedure. I just sat on the couch binge-watching crime documentaries and eating crackers. By day five, I felt worse than I did on day one. My body was stiff, my energy was gone, and I was genuinely irritable. Starting small, even five-minute walks around the living room, changed everything. The key is choosing the right kind of movement at the right time, and you don’t need an expensive gym membership to do it.

Getting Clearance First (Don’t Skip This Part)
Before you do a single stretch, get your surgeon’s green light. I know that sounds obvious, but I almost started a yoga video on day three because I “felt fine.” My doctor reminded me that internal healing doesn’t match how you feel externally.
Ask your doctor three specific things: what movements are off-limits, when you can start light exercise, and what warning signs to watch for. Write the answers down. I kept mine on a sticky note on my fridge. Some procedures restrict lifting, others restrict bending or twisting. Your workout plan needs to work within those boundaries, not around them.
Phase 1: The First Week Post-Surgery
The first week is about survival, not fitness. Your body is using a huge amount of energy just to heal, so the goal here is gentle movement that keeps blood flowing and prevents stiffness.
Here’s what I actually did during week one:
- Walked slowly around my apartment for 5 to 10 minutes, three times a day
- Did seated ankle circles and gentle neck rolls while watching TV
- Practiced deep breathing exercises to keep my lungs active after anesthesia
- Stood up from sitting every 30 to 45 minutes
Cost of all this? Zero dollars. You don’t need anything except a chair and some floor space. These tiny movements don’t feel like much, but they made a noticeable difference in how quickly the post-surgery fog lifted. I slept better too.

Phase 2: Weeks Two and Three
Once my doctor confirmed things were healing well at my one-week follow-up, I started adding slightly more structured movement. This is where affordable home workouts for people recovering from minor surgery start to feel like actual exercise.
I used YouTube channels like Yoga With Adriene and HASfit, both completely free. Adriene has a “Yoga for Healing” series that I went back to again and again. HASfit has low-impact workout videos specifically for beginners and people with limited mobility.
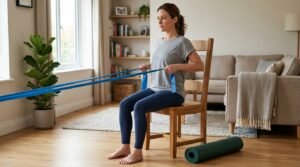
My routine during this phase looked like this: 15 to 20 minutes of gentle yoga in the morning, a short walk in the afternoon (around the block, nothing crazy), and some light seated resistance band work in the evening. I bought a pack of resistance bands on Amazon for about $12. That was my only expense, and honestly, I still use those bands months later.
Movements That Worked Best
Seated leg lifts, standing wall push-ups (once cleared for upper body), gentle cat-cow stretches, and modified bird-dogs were my go-to exercises. I avoided anything that engaged my core too aggressively since that’s where my incision was. If your surgery was on a different part of your body, your safe movement list will look different, so always circle back to what your doctor approved.
Phase 3: Weeks Four Through Six
By week four, I was feeling almost normal but had to keep reminding myself that “feeling good” doesn’t mean “fully healed.” This is the phase where people overdo it and set themselves back. I know because I almost did exactly that with a kettlebell video that looked easy but definitely was not.
Instead, I gradually increased my walks to 30 minutes and added bodyweight exercises like squats (shallow ones at first), wall sits, and standing side leg raises. I started following Caroline Girvan’s beginner-level videos on YouTube, modifying anything that felt like too much pressure on my healing site.
I also downloaded the Nike Training Club app, which is free and has a solid library of low-impact workouts you can filter by difficulty and body area. Being able to exclude core-heavy workouts while still getting a decent session was exactly what I needed. The app costs nothing and honestly rivals some of the paid platforms I’ve tried in the past.
Affordable Equipment That’s Actually Worth Buying
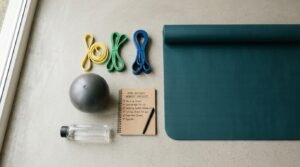
You don’t need much, but a few cheap items made my recovery workouts significantly better. Here’s what I actually purchased and used:
- Resistance bands (Amazon, $12 for a set of five): These were the most versatile piece of equipment I owned during recovery. I used them for seated rows, shoulder presses, and leg exercises without any jarring impact.
- A yoga mat (I got a basic one from Walmart for $10): The carpeted floor was fine for a few days, but once I started doing more floor work, my knees needed the cushion.
- A stability ball ($15 at Target): Great for seated exercises and gentle core engagement once I was cleared for it around week five.
Total investment: roughly $37. Compare that to a single session with a physical therapist (often $50 to $150 with insurance copays) and you can see why building an affordable home workout setup made sense for me.
Free Resources That Rival Expensive Programs
The internet is packed with free workout content, but finding stuff specifically geared toward recovery takes some digging. I did the digging so you don’t have to.
YouTube was my primary resource. Beyond Adriene and HASfit, I found Bob and Brad (two physical therapists with a massive library of rehab-friendly exercises) incredibly helpful. Their videos are short, specific, and genuinely informative without trying to sell you anything.
The NHS website also has free post-surgery exercise guides organized by procedure type. Even though it’s a UK resource, the exercises are universal and clearly illustrated. For a more structured approach, the free version of the Down Dog app lets you customize yoga sessions by duration, difficulty, and focus area. I set mine to “gentle” and “restorative” and got sessions that felt tailor-made for where I was in recovery.
Affordable Home Workouts for People Recovering From Minor Surgery on a Budget
Let me break down what a realistic weekly budget looks like for this. Because “affordable” means different things to different people, and I want to be specific.
If you spend $0, you can absolutely have a complete recovery workout program using YouTube, walking, and bodyweight exercises. That’s not a compromise either. Some of the best sessions I had cost nothing.
If you spend $15 to $40 once, you can add resistance bands, a yoga mat, and maybe a stability ball. These items last for years and serve you well beyond recovery.
If you want a subscription app, the most cost-effective option I found was Apple Fitness+ at $9.99 per month, which has a solid “mindful cooldown” and low-impact section. But honestly, the free options were just as good for my purposes. FYI, many insurance plans offer wellness reimbursements that can cover fitness apps or basic equipment, so check with your provider before spending anything.
Common Mistakes I Made (So You Don’t Have To)
Recovering from surgery while trying to stay active is a weird mental game. You feel lazy for not doing more, but you’re told to rest. Here are the mistakes I made during my own recovery:
I compared my progress to pre-surgery fitness levels. That’s a recipe for frustration. I tried a “beginner” HIIT video during week three and immediately regretted it. My incision site was sore for two days afterward. I also skipped rest days because I felt guilty, which actually slowed my recovery rather than speeding it up.
The biggest mistake was not tracking my workouts. Once I started writing down what I did each day in a simple notebook, I could see real progress. Going from a five-minute walk to a 30-minute walk over four weeks doesn’t feel dramatic in the moment, but on paper, it’s huge. A $3 notebook became one of my most useful recovery tools.
When to Stop and Call Your Doctor
This part isn’t optional reading. Sharp pain during exercise, new swelling around your incision, any bleeding or discharge, dizziness, or feeling significantly worse after a workout are all signs to stop immediately and contact your surgeon.
I had one scare during week three when I noticed some pulling near my incision after a stretching session. It turned out to be scar tissue tightness, not anything dangerous, but I’m glad I called. Ten minutes on the phone with my nurse saved me days of anxiety. IMO, it’s always better to feel silly for calling about nothing than to push through something serious.
Frequently Asked Questions
How soon after minor surgery can I start working out at home?
Most doctors clear patients for very gentle movement like short walks within 24 to 48 hours after minor procedures. Structured exercise usually gets approved between one and two weeks post-surgery, depending on the procedure. Always get personalized clearance from your surgeon before starting any routine, because every surgery and every body heals differently.
What are the best affordable home workouts for someone recovering from surgery?
Gentle yoga, seated resistance band exercises, short walks, and bodyweight movements like wall push-ups or shallow squats work well for most people. Free YouTube channels like Yoga With Adriene, HASfit, and Bob and Brad offer excellent recovery-friendly content. Start with shorter sessions of 10 to 15 minutes and build up gradually as your doctor approves.
Do I need to buy equipment for post-surgery home workouts?
Not at all. Bodyweight exercises and walking require zero equipment and can carry you through the entire recovery period. If you want to add variety, a set of resistance bands ($12) and a yoga mat ($10) are the most useful budget purchases. Everything else is optional and can wait until you’re further along in healing.
Can I follow regular workout videos during surgical recovery?
Regular workout videos are almost always too intense for the first several weeks of recovery. Even videos labeled “beginner” often include jumping, fast movements, or heavy core engagement that could strain a healing incision. Look for videos specifically tagged as “low impact,” “gentle,” “restorative,” or “rehab.” Modify anything that doesn’t feel right and skip movements your doctor has restricted.
How do I know if I’m doing too much during recovery?
Pain at or near your incision site during or after exercise is the clearest sign. Increased swelling, unusual fatigue that lasts more than a few hours, and feeling worse the day after a workout all indicate you’ve pushed too hard. Scale back to whatever level felt comfortable before, and give yourself a rest day or two. Progress isn’t linear during recovery, and that’s completely normal.
Conclusion
Recovery workouts don’t need to cost a fortune or look like what fitness influencers post on Instagram. A few free videos, a cheap set of resistance bands, and patience got me from the couch back to feeling like myself in about six weeks. What’s the first movement you’re planning to try after your surgery?